想要实现自动化编译并生产打包替换文件,首要的对项目进行编译生成。一般编译 donnet 项目有三种方式 csc.exe,MSbuild(不需要安装vs),devenv(需要安装vs)。因为自己已经安装了 vs 了,所以直接使用 devenv 去编译程序了。
大致流程如下
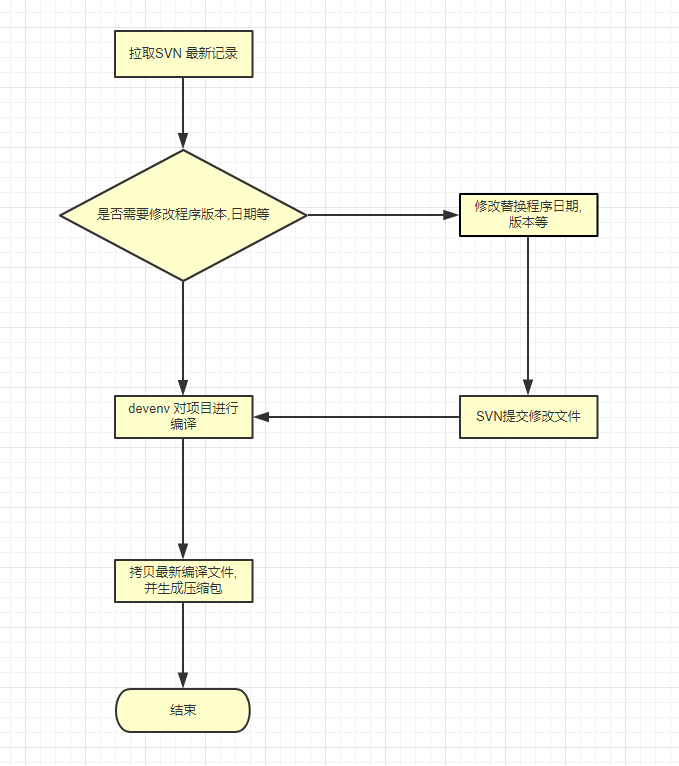 流程图
流程图
SVN 更新提交文件
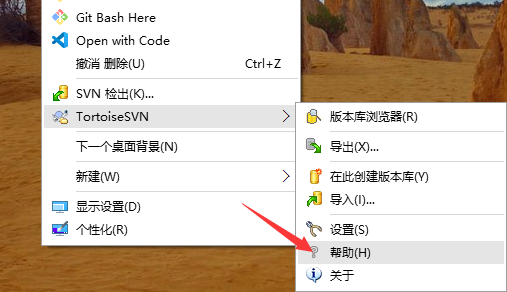
SVN 工具使用 TortoiseSVN,为了简化操这里直接使用 TortoiseProc.exe(TortoiseSVN的GUI程序) 所提供的命令行,对项目进行更新等操作。 使用 Demo
TortoiseProc.exe /command:commit
                 /path:"c:\svn_wc\file1.txt*c:\svn_wc\file2.txt"
                 /logmsg:"test log message" /closeonend:2

参数大概意思

/closeonend:2 如果没发生错误和冲突则自动关闭对话框
/command    执行的操作
        :update 更新
        :commit 提交
/path   路径
/logmsg 提交备注信息
具体的使用方式可以在 TortoiseSVN 提供帮助文档里去查看。
动态去修改程序版本和日期
因为项目的日期和版本是写死在了程序里的,每次给测试生产替换文件时候都得去修改程序日期.大致思路是通过正则去修改文件。考虑到需要后面可能需要修改的地方较多,目前是通过 Json 去配置需要修改文件 和 对应正则 和 调用的方法(获取的值)。为了提供修改灵活性,目前是通过 CSharpCodeProvider 去编译 C# 文件,来方便随时修改获取新的值得规则。
大致流程如下 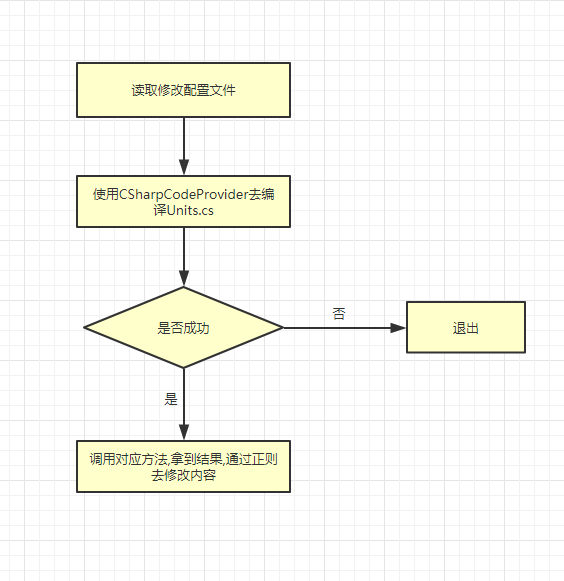
json 配置文件如下
{
    "FilePath": "C:\\Test.cs",//路径
    "Pattern": ".* string SerEdition .*",//正则规则
    "FunctionName": "GetEditDataTime", //以及需要调用的方法
    "Params": [] //参数
}
假如 Test.cs 文件需要修改内如下
    public static string SerVer = "V7.6.0";

    public static string SerEdition = "2019.12.25";
新增一个 Units.cs(用于动态编译) 文件,生成操作改为内容,不参与编译。
//Units.cs 文件

using System;
namespace DynamicRunCode
{
    public class Units
    {
        public string GetEditDataTime()
        {
            return "        public static string SerEdition = \"" + DateTime.Now.ToString("yyyy.MM.dd") + "\";";
        }
    }

    // 可自己在这添加方法
}
对 CSharpCodeProvider 进行简单封装,CSharpRunCode 类 主要是对 C# 字符串进行编译,和提供一个可以调用 C# 字符串中方法。
public class CSharpRunCode
{
    CompilerResults cr;
    /// <summary>
    /// 编译 C# Code 字符串
    /// </summary>
    /// <param name="csharpStr"></param>
    /// <returns>返回编译结果</returns>
    public CSharpRunCode (string csharpStr)
    {
        CSharpCodeProvider cs = new CSharpCodeProvider();
        CompilerParameters cp = new CompilerParameters
        {
            GenerateInMemory = true,//设定在内存中创建程序集
            GenerateExecutable = false//设定是否创建可执行文件,也就是exe文件或者dll文件
        };
        cr = cs.CompileAssemblyFromSource(cp, csharpStr);
        if (cr.Errors.HasErrors)
        {
            foreach (CompilerError item in cr.Errors)
            {
                Console.WriteLine(item.ToString());
            }
        }
    }

    /// <summary>
    /// 调用方法
    /// </summary>
    /// <param name="typeName"></param>
    /// <param name="functionName"></param>
    /// <param name="pars"></param>
    /// <returns></returns>
    public object RunFunctino(string typeName, string functionName, params object[] pars)
    {
        Assembly ass = cr.CompiledAssembly;
        object obj = ass.CreateInstance(typeName);
        MethodInfo mi = obj.GetType().GetMethod(functionName);
        return mi.Invoke(obj, pars);
    }
}
使用方法
//FunctionName 配置中函数名
//FilePath 文件路径
//Pattern 正则规则

CSharpRunCode runCode = new CSharpRunCode(File.ReadAllText("xxx\\Units.cs"));
string result = (string)runCode.RunFunctino("DynamicRunCode.Units", FunctionName);
string fileText = File.ReadAllText(FilePath);
List<string> fileTextArr = File.ReadAllLines(FilePath).ToList();
var matches = Regex.Matches(fileText, Pattern);
File.WriteAllText(FilePath, Regex.Replace(fileText, Pattern, result));

Console.WriteLine($"{Environment.NewLine}文件路径:【{FilePath}】");
Console.WriteLine($"替换【{matches.Count}】处");
Console.ForegroundColor = ConsoleColor.Yellow;

foreach (Match match in matches)
{
    int rowNum = fileTextArr.FindIndex(t => t.Contains(match.Value.Trim()));
    if (rowNum>-1)
    {
        fileTextArr[rowNum]="";
    }
    Console.WriteLine($"原值:【{match.Value.Replace("\r", "")}】行号:【{rowNum + 1}】");
}

Console.ForegroundColor = ConsoleColor.Green;
Console.WriteLine($"新值:【{result}】");
Console.ForegroundColor = ConsoleColor.White;
执行结果 
使用 devenv 进行编译
VS 安装的是 2017,devenv 正常路径应该是 [C:\Program Files (x86)\Microsoft Visual Studio\2017\Professional\Common7\IDE] 下,网上一堆动态查找 devenv 路径的方法.最后感觉通过注册表方式比较靠谱,参考这篇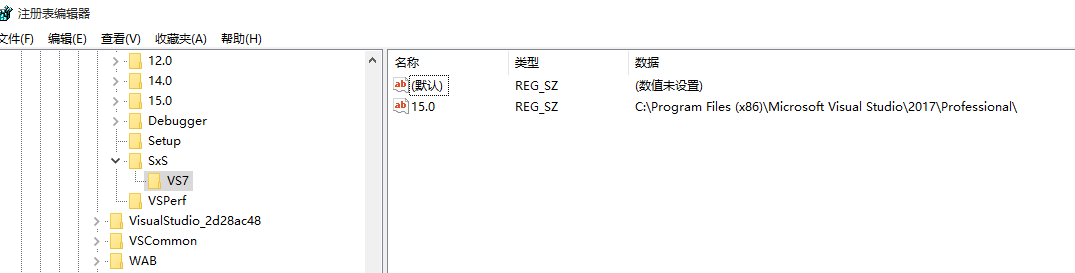
具体实现
class DevenvOpt
{

    /// <summary>
    /// 是否安装VS
    /// </summary>
    public bool IsFindDevenv { get; set; } = false;
    /// <summary>
    /// devenv 路径
    /// </summary>
    public string DevenvExePath { get; set; }
    /// <summary>
    /// devenv 所在目录路径
    /// </summary>
    public string DevenvDirPath { get; set; }
    /// <summary>
    /// 版本
    /// </summary>
    public int Version { get; set; }

    public DevenvOpt()
    {
        string path = FindDevenv();
        if (!string.IsNullOrWhiteSpace(path))
        {
            IsFindDevenv = true;
            DevenvExePath = path;
            DevenvDirPath = path.Replace("devenv.exe", "");
        }
    }

    private string FindDevenv()
    {
        string registryPath = @"SOFTWARE\Wow6432Node\Microsoft\VisualStudio\SxS\VS7";
        var localMachineRegistry = RegistryKey.OpenBaseKey(RegistryHive.LocalMachine, Environment.Is64BitOperatingSystem ? RegistryView.Registry64 : RegistryView.Registry32);
        Dictionary<string, string> vsPaths = ReadRegistryInfo(localMachineRegistry, registryPath);
        string highestVSdevenvPath = string.Empty;
        if (vsPaths != null && vsPaths.Any())
        {

            var tempVersion = 0;
            foreach (KeyValuePair<string, string> kvp in vsPaths)
            {
                var devenvExePath = Path.Combine(kvp.Value, @"Common7\IDE\devenv.exe");
                if (File.Exists(devenvExePath))
                {
                    var currentVersion = Convert.ToInt32(kvp.Key.Split('.')[0]);
                    if (currentVersion > tempVersion)
                    {
                        Version = currentVersion;
                        highestVSdevenvPath = devenvExePath;
                    }
                }
            }
        }
        return highestVSdevenvPath;
    }

    private Dictionary<string, string> ReadRegistryInfo(RegistryKey registryKey, string registryInfoPath)
    {
        if (registryKey == null || string.IsNullOrEmpty(registryInfoPath)) return null;
        try
        {
            RegistryKey rsg = registryKey.OpenSubKey(registryInfoPath, false);
            if (rsg != null)
            {
                var keyNameArray = rsg?.GetValueNames();
                var result = new Dictionary<string, string>();
                foreach (var name in keyNameArray)
                {
                    string keyValue = (string)rsg.GetValue(name);
                    result.Add(name, keyValue);
                }
                rsg.Close();
                return result;
            }
            return null;
        }
        catch
        {
            return null;
        }
    }
}
找到了路径后接下来就是,将路径写入环境变量(或者执行 devenv 先调转到目录),调用 CMD 然后去执行 devenv 程序去编译项目操作了。 对调用 CMD 简单封装下
class CMD
{
        private static readonly string CmdPath = @"cmd.exe";

        /// <summary>
        /// 执行cmd命令
        /// <param name="cmd">执行的命令</param>
        public static CMD_RES RunCmd(params string[] cmds)
        {
            CMD_RES res = new CMD_RES();

            using (Process p = new Process())
            {
                p.StartInfo.FileName = CmdPath;
                p.StartInfo.UseShellExecute = false;
                p.StartInfo.RedirectStandardInput = true;
                p.StartInfo.RedirectStandardOutput = true;
                p.StartInfo.RedirectStandardError = true;
                p.StartInfo.CreateNoWindow = true;
                try
                {
                    p.Start();

                    //向cmd窗口写入命令
                    foreach (string cmd in cmds)
                        p.StandardInput.WriteLine(cmd);

                    //关闭写入流
                    p.StandardInput.Close();

                    //获取cmd窗口的输出信息
                    string output = p.StandardOutput.ReadToEnd();
                    string error = p.StandardError.ReadToEnd();
                    //等待程序执行完退出进程
                    p.WaitForExit();
                    res.ToRes(output, error);
                }

                catch (System.Exception e)
                {
                    System.Console.WriteLine(e.Message);
                }
                finally
                {
                    p.Close();
                    p.Dispose();
                }
                return res;
            }
        }
    }

    class CMD_RES
    {
        /// <summary>
        /// 状态
        /// </summary>
        public bool State { get; set; } = true;
        /// <summary>
        /// 输出信息
        /// </summary>
        public string Text { get; set; }
        /// <summary>
        /// 错误信息
        /// </summary>
        public string Error { get; set; }

        public void ToRes(string output, string error)
        {
            State = string.IsNullOrWhiteSpace(error);
            Text = output;
            Error = error;
        }
    }
devenv 具体参数可以参考微软官网文档 示例
//DevenvDirPath devenv 所在目录
CMD_RES res = CMD.RunCmd("@echo off ", $"{DevenvDirPath.Substring(0,1)}:",$"cd {DevenvDirPath}",$"devenv 项目路径  /rebuild Release");
devenv 回输出,然后判断是否全部编译成功
成功x个 失败x个 跳过x个文件编译好之后,就是对文件的拷贝操作了这里就不描述了
效果如下 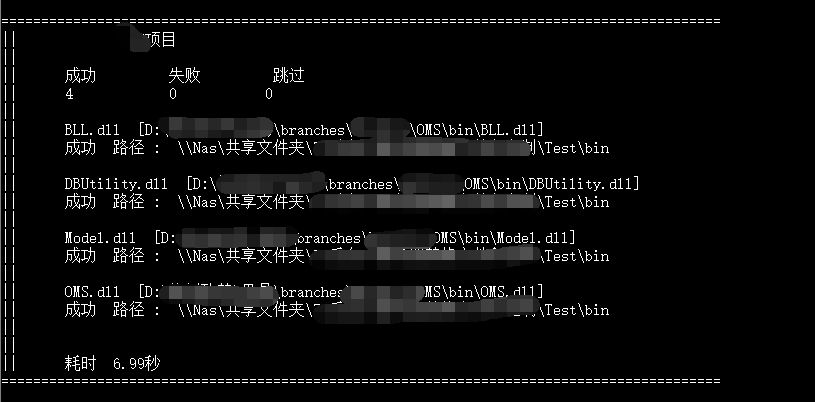
- 本文链接:
- 版权声明:本博客所有文章除特别声明外,均默认采用 CC BY-NC-SA 4.0 许可协议。
其他文章
JavaScript中的 [[prototype]]、prototype、__proto__ 关系
- 20-03-03
- 02:16
- 记录类
深入理解 JavaScript 事件( 第1章 )
- 19-12-28
- 02:16
- 转载